Mastering Remote SSH Login For IoT Devices On Ubuntu
Remote SSH login has become an essential tool for managing IoT devices running on Ubuntu. Whether you're a developer, administrator, or hobbyist, understanding how to securely connect to your IoT devices remotely is crucial for efficient management and troubleshooting. This guide will walk you through everything you need to know about setting up and securing remote SSH access for IoT devices on Ubuntu.
In today's interconnected world, Internet of Things (IoT) devices are becoming increasingly common in both personal and professional environments. These devices often run on lightweight operating systems like Ubuntu, which provides robust features and flexibility. However, managing these devices remotely can be challenging without proper knowledge of tools like SSH (Secure Shell).
This article aims to provide a comprehensive overview of remote SSH login for IoT devices on Ubuntu. By the end of this guide, you will have a solid understanding of the setup process, security best practices, and troubleshooting tips. Let's dive in!
Table of Contents
- Introduction to SSH
- Setting Up SSH on Ubuntu
- Connecting to IoT Devices
- Securing Your SSH Connection
- Troubleshooting Common Issues
- Advanced SSH Features
- Best Practices for Remote Access
- Integrating with IoT Platforms
- Case Studies and Examples
- Conclusion and Next Steps
Introduction to SSH
SSH, or Secure Shell, is a cryptographic network protocol that enables secure communication between two devices over an unsecured network. It is widely used for remote login and other secure network services. When working with IoT devices on Ubuntu, SSH provides a reliable way to access and manage these devices from anywhere in the world.
Why Use SSH for IoT Devices?
- Secure communication through encryption
- Remote access to device command-line interfaces
- Easy file transfer using SFTP (SSH File Transfer Protocol)
- Support for automation and scripting
SSH is particularly useful for IoT devices running on lightweight operating systems like Ubuntu, as it allows administrators to manage these devices without needing physical access. This makes it ideal for remote monitoring, troubleshooting, and updates.
SSH vs Other Remote Access Protocols
While there are several remote access protocols available, SSH stands out due to its security features and ease of use. Compared to protocols like Telnet, which transmit data in plain text, SSH encrypts all communication, making it much more secure. Additionally, SSH supports public key authentication, which enhances security by eliminating the need for passwords in many cases.
Setting Up SSH on Ubuntu
Setting up SSH on Ubuntu is a straightforward process. By default, Ubuntu does not come with an SSH server installed, so you will need to install and configure it manually. Follow these steps to get started:
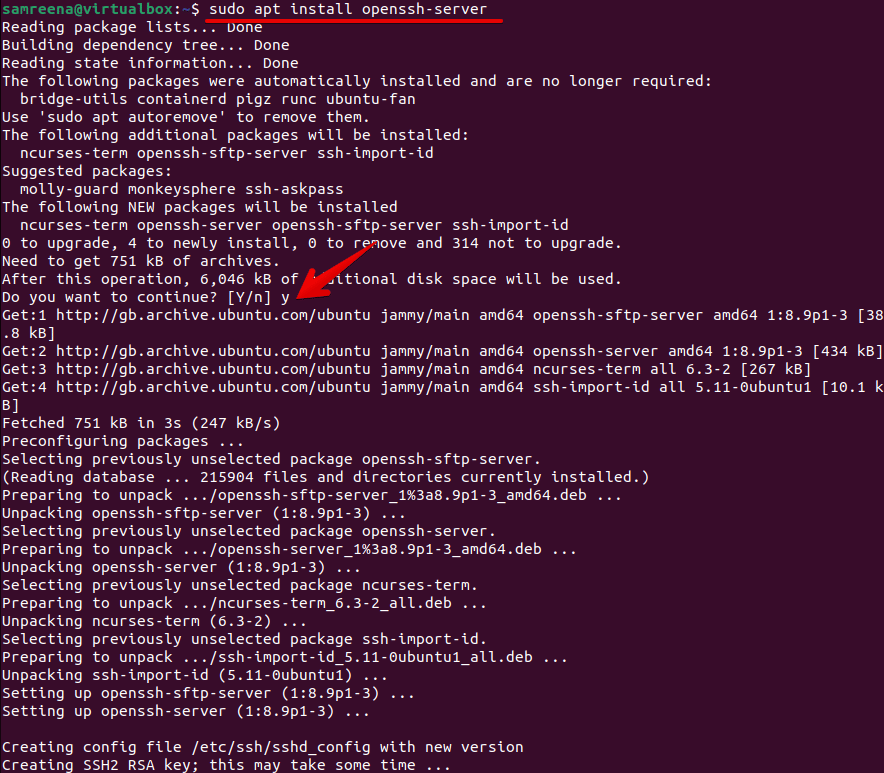
Step 1: Install the SSH Server
Open a terminal on your Ubuntu-based IoT device and run the following command to install the OpenSSH server:
sudo apt update && sudo apt install openssh-server
Step 2: Verify SSH Service
Once the installation is complete, verify that the SSH service is running by using the following command:
sudo systemctl status ssh
Step 3: Configure SSH Settings
You can customize SSH settings by editing the configuration file located at /etc/ssh/sshd_config. Use a text editor like nano to make changes:
sudo nano /etc/ssh/sshd_config
Common configuration options include:
- Changing the default port (22)
- Disabling password authentication
- Enabling public key authentication
Restarting the SSH Service
After making changes to the configuration file, restart the SSH service to apply them:
sudo systemctl restart ssh
Connecting to IoT Devices
Once the SSH server is set up on your IoT device, you can connect to it from any remote location. Follow these steps to establish a connection:
Step 1: Obtain the Device's IP Address
You will need the IP address of your IoT device to connect to it remotely. You can find this information by running the following command on the device:
ip addr
Step 2: Connect Using an SSH Client
From your local machine, use an SSH client to connect to the IoT device. For example, on a Linux or macOS system, you can use the terminal:
ssh username@device_ip_address
Replace username with the appropriate user account on the IoT device and device_ip_address with the actual IP address.
Using SSH Clients on Windows
If you're using a Windows machine, you can use tools like PuTTY or the built-in SSH client in Windows 10 and later versions. The process is similar to connecting from Linux or macOS systems.
Securing Your SSH Connection
Security is paramount when dealing with remote access to IoT devices. Here are some best practices to ensure your SSH connections remain secure:
1. Use Strong Passwords
Ensure that all user accounts on your IoT device have strong, complex passwords. Avoid using easily guessable passwords or default credentials.
2. Enable Public Key Authentication
Public key authentication adds an extra layer of security by requiring a private key to access the device. To set this up, generate a key pair on your local machine:
ssh-keygen -t rsa -b 4096
Then, copy the public key to your IoT device:
ssh-copy-id username@device_ip_address
3. Disable Root Login
Disallowing direct root login reduces the risk of unauthorized access. Edit the SSH configuration file and set the following option:
PermitRootLogin no
Firewall Configuration
Limit access to your SSH server by configuring a firewall to only allow connections from trusted IP addresses. On Ubuntu, you can use UFW (Uncomplicated Firewall) to achieve this:
sudo ufw allow from trusted_ip_address to any port 22
Troubleshooting Common Issues
Even with proper setup, you may encounter issues when trying to connect to your IoT device via SSH. Here are some common problems and their solutions:
Issue 1: Connection Refused
If you receive a "Connection refused" error, ensure that the SSH service is running on the IoT device and that the firewall allows incoming connections on port 22.
Issue 2: Permission Denied
This error usually occurs when public key authentication is misconfigured. Double-check that the public key has been correctly added to the authorized_keys file on the IoT device.
Issue 3: Timeout Errors
Timeout errors may indicate network issues or incorrect IP addresses. Verify the device's IP address and ensure that there are no network interruptions.
Advanced SSH Features
Beyond basic remote access, SSH offers several advanced features that can enhance your workflow:
1. SSH Tunnels
SSH tunnels allow you to securely forward traffic between your local machine and the IoT device. This is particularly useful for accessing services running on the device that are not exposed to the public internet.
2. SSH Config File
Create an SSH config file to store frequently used connection settings. This simplifies the connection process and reduces the risk of errors.
3. Port Forwarding
Use SSH port forwarding to access services on the IoT device from your local machine. For example, you can forward a web server running on the device to a local port:
ssh -L 8080:localhost:80 username@device_ip_address
SSH Multiplexing
SSH multiplexing allows you to reuse existing connections, reducing the time it takes to establish new sessions. Enable this feature by adding the following lines to your SSH config file:
ControlMaster auto
ControlPath ~/.ssh/master-%r@%h:%p
Best Practices for Remote Access
To ensure smooth and secure remote access to your IoT devices, follow these best practices:
1. Regularly Update Your System
Keep your Ubuntu installation and SSH server up to date with the latest security patches and updates.
2. Monitor Logs
Regularly check SSH logs for any suspicious activity. You can find these logs in /var/log/auth.log.
3. Use a Strong Firewall
Implement a robust firewall configuration to protect your IoT devices from unauthorized access.
Integrating with IoT Platforms
SSH can be integrated with various IoT platforms to enhance functionality and streamline management. For example, you can use SSH to automate data collection, deploy updates, or trigger actions based on sensor readings.
Example: Automating Sensor Data Collection
Create a script on your IoT device that periodically collects sensor data and transfers it to a remote server using SSH. This allows you to centralize data storage and analysis.
Case Studies and Examples
Here are some real-world examples of how SSH is used to manage IoT devices on Ubuntu:
Case Study 1: Smart Agriculture
A farmer uses SSH to remotely monitor and control irrigation systems powered by IoT devices running on Ubuntu. This setup allows for precise water management, reducing waste and improving crop yields.
Case Study 2: Industrial Automation
An industrial facility employs SSH to manage a network of IoT sensors monitoring machinery performance. Real-time data collection and analysis enable predictive maintenance, minimizing downtime.
Conclusion and Next Steps
Remote SSH login is an invaluable tool for managing IoT devices on Ubuntu. By following the steps outlined in this guide, you can set up secure and efficient remote access to your devices. Remember to adhere to best practices and continuously monitor your systems for any potential security threats.
We encourage you to take the following actions:
- Practice setting up SSH on a test IoT device
- Explore advanced SSH features to enhance your workflow
- Share your experiences and insights in the comments section below
Thank you for reading, and don't forget to check out our other articles for more tips and tricks on IoT and Ubuntu management!